

Game assets
Build a house in AssetLoom Studio
Lay out a game-ready house in the browser: footprint, storeys, windows and doors, a porch, fence and chimney, furnished rooms, then export it.
By AssetLoom Team, published , Updated , 7 min read
The House Starter is a building kit for Studio Build. Instead of picking parts for a character, you lay out a house on a grid: how big it is, how many storeys, where the windows and doors go, what is inside, and what stands around it. Studio puts the walls, corners, roof, floors and stair together for you, and the export is one engine-ready file with levels of detail and collision.
What it costs
The House Starter is 200 credits. Building, saving and previewing are free; you only spend credits when you export (200 credits per export), and exporting the same house again costs nothing.
Packs add more to the Starter, each 100 credits: the Porch & Garden Pack, the Bedroom & Study Pack and the Kids' Bedroom & Nursery Pack. A pack does nothing on its own, so if you don't have the Starter yet, its page offers both together in one purchase.
1. Start from a preset
Open Studio, choose the House Starter in the kit picker at the top, and pick a preset under Presets: Seaside family house, Suburban with garage, Farmhouse, Cottage (hip roof), Brick L-house or Modern flat roof. Packs you own add their own presets (the Porch & Garden Pack adds three). Each sets the walls, windows, doors, roof and a furnished layout, so you start with a whole house to change rather than an empty grid.
2. Set the footprint and storeys
Open the Building section. Choose a Rectangle or an L shape, then set the width and depth with the steppers. A module is 2 m, so a house 8 modules wide is 16 m. A building can be up to 8 modules on each side and up to 3 storeys (a storey is 3 m).
- Gable and hip roofs need an even depth; hip roofs go on rectangles. A flat roof with a parapet fits any footprint.
- Making the building smaller keeps what still fits. When a change drops something (windows on a wall that got shorter, a room set or the stair that no longer fits), a note under the steppers says what went, for example "Facade modules that no longer fitted became wall: 3 windows." Undo brings it all back.
A new storey starts as plain wall
When you add a storey it has no windows yet, so it shows as a blank band. Give it windows in Facades (next step). The camera doesn't move when the house grows, so zoom out or orbit to see a new top storey.
3. Place windows and doors
Under Facades, pick a side of the house (front, right, back, left, and the wing on an L shape). Each storey is a row of modules, seen from outside, left to right. Click a module to cycle it through wall, window, door and garage door.
To change a whole run at once, drag along a storey: the module you press on changes to the next kind, and every module you cross gets the same. Drag along an upper storey once to put windows all the way across.
Adding a third storey leaves a blank band of plain wall; one drag along the new storey in the Facades rows paints windows all the way across it.
- Doors and garage doors go on the ground storey only.
- The window, door and garage-door styles come from the parts you choose in the kit's slots (for example sash, sash with shutters, casement or picture windows). Change the part and every window of that kind changes with it.
4. Floors, the stair and furnished rooms
Floors on every storey is on by default. Turn it off for an empty shell (no floors, stair or rooms), which is handy for a backdrop building.
To furnish it, choose what to place under Click a cell to place: a room set (living room, dining room, kitchen or den in the Starter, more in the packs) or the Stair. Choose the Storey and click a free cell on the floor plan. Cells the room set can't go on are dimmed before you click, and if you try one anyway Studio says why (outside the building, on the stair, or over another room set).
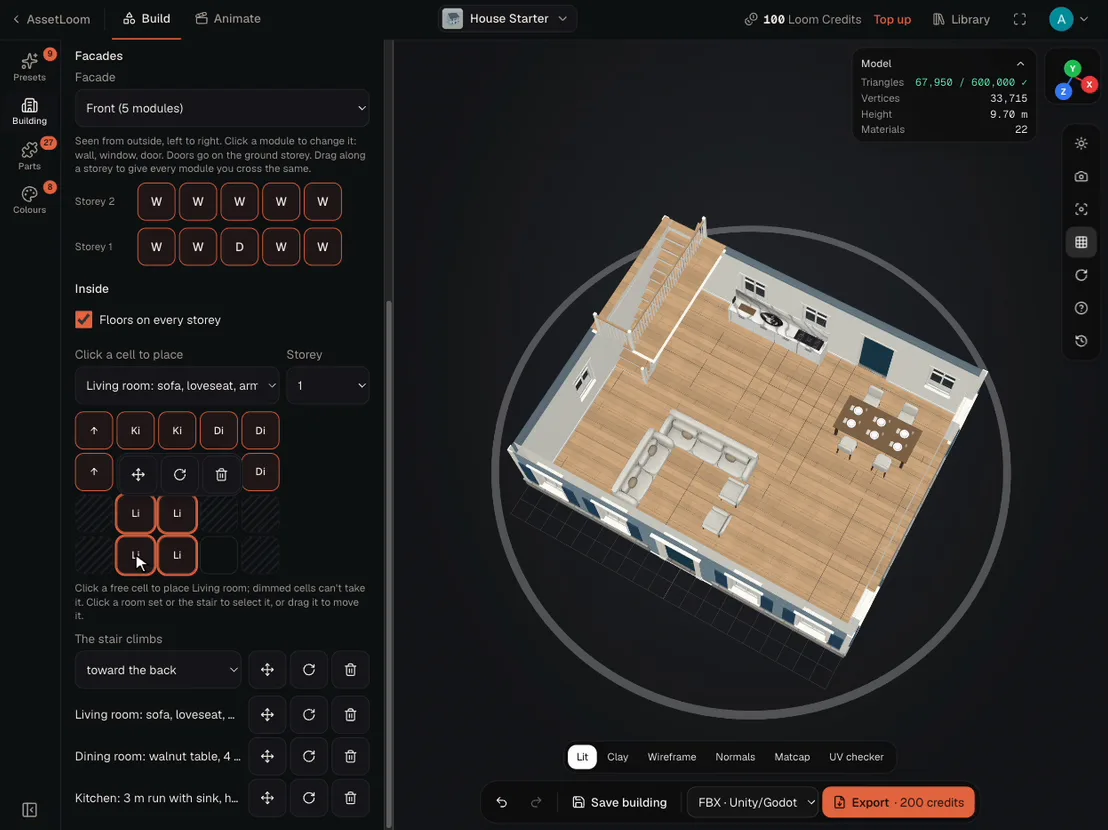
Click a room set (or the stair) to select it. Then:
- Move: drag it to another cell, or press its move button and use the arrow keys, then Enter to put it down (Escape cancels). Each step tells you whether it fits.
- Turn: the turn button turns it 90 degrees. If the turned set wouldn't fit, the button says why.
- Take off: the bin button. Each placed room set is also listed under the plan with the same three buttons.
Seen from above with the house cut away to storey 1, the living room set is selected on the floor plan and dragged to another spot; green cells show where it fits, and the room moves in the preview.
If you choose a room set in Parts instead, Studio takes you to Building › Inside with that room set ready to place, because room sets go on a floor cell rather than in a slot.
- The stair needs at least two storeys and floors on. It climbs through every storey, and the floor above is cut open around it.
- Use The stair climbs to point it toward the front, the back or a side.
5. Porch, chimney and fence
With the Porch & Garden Pack the Building section gets Porch, chimney and fence. Choose which porch, chimney and fence you want in Parts (three porches, two chimneys and three fences, each with its own gate), then switch them on here.
- Porch: tick Porch, pick the Porch facade, and set where it starts and how wide it is. The strip under the controls shows that facade's ground storey: drag the porch along it, or drag either end to make it wider or narrower. Modules it can't start on are hatched, and a drop that doesn't fit snaps back with the reason.
- Chimney: tick Chimney and choose On the gable end. It runs from the ground past the ridge, on one, two or three storeys.
- Fence: tick Fence for a fence round the plot. Set the Fence distance (1 to 3 modules out) and which sides are fenced. With the front side on, choose Gate in the front fence, or drag the gate along the Front fence strip.
On the Seaside house with porch preset, the porch is dragged along the front of the house, widened from its end to cover the whole front, and the gate is dragged along the front fence.
In the export the porch, chimney and fence are their own nodes with levels of detail and colliders, and each gate leaf is hinged so you can open it in code.
6. Look inside
The buttons at the top of the panel switch what you see: Whole building, Without the roof, or Up to storey 1 (and 2 on a three-storey house). They only change the preview; the export always has the whole house.
7. Colours
Under Colours, each part of the house has its own colour: walls, trim, roof, window frames, door, shutters, interior walls and floors, and with the Porch & Garden Pack the porch floor, porch ceiling and porch metal roof. Pick from the kit's swatches or set any colour.
8. Save and export
Press Save building to come back to the house later (saving is free). When you're happy, choose a format and export. You get one file with:
- One mesh per storey and one for the roof (Storey_1, Storey_2, Roof), so you can hide upper floors in your game.
- Three levels of detail for every storey, the roof and any porch, chimney and fence.
- Simple box colliders for walls, floors, the stair and roof planes, with doorways left open so characters can walk through.
- Doors and gates as separate hinged leaves you can open in code.
- Room sets as their own objects, and a second UV set for baked lighting.
Room set packs
| Pack | Room sets |
|---|---|
| Bedroom & Study Pack | Main bedroom, bedroom, study, dressing room and reading corner |
| Kids' Bedroom & Nursery Pack | Bunk room, kid's bedroom, nursery, playroom and homework nook |
Each pack also adds a preset that uses its rooms. Use Show parts from at the top of Presets or Parts to see one pack's parts at a time; it only changes what the pickers list, not what is in your house.
Tips
- Start from the preset closest to what you want, then change one thing at a time.
- If a change can't be built (say, a door on an upper storey), the Building section tells you why and the preview keeps the last house that worked.
- Hip roofs read best on simple rectangles; use gables or a flat roof on an L shape.
- Changed a shape and lost some windows? Press Undo rather than putting them back one by one.
Spotted a mistake or have a question? Email support@assetloom.io.